Finishing Touches
The only things left now are to fit the forelock, mane and tail, fit the saddlery, and attach the horse to the stand.
The rocking horse kit comes complete with a section of a real horse's mane, still attached to the hide. There was more than enough to make the forelock, mane and tail for my horse, but it was pretty dirty and the hide was very dry, making it extremely stiff and hard to work with. The first job, then, is to soak the hide in water overnight to soften up the hide and loosen any dirt stuck to the hairs.
Once soaked, the hide becomes very pliable. I washed and rinsed the whole thing several times, using detergent to clean everything up. I did this in the bath in our house, which made things fairly easy, but you might prefer to do it outdoors if you're at all concerned about what might be in the 'dirt'!
Once clean, I allowed the hide and hair to dry for a few hours and then took it back out to the garage/workshop. It will take the hide several days to dry out again, so it will comfortably remain workable long enough to get everything fitted. You want it to be dry to the touch - no water dripping out! - but still pliable.
At this stage I hung the hair up from the ceiling and brushed it out:


Next I tried to figure out the best way to divide it up. The forelock and mane require three or four strips about an inch (two centimeters) wide, all with about the same amount and length of hair, and long enough when placed end to end to run from the base of the horse's neck to just in front of its ears. The tail requires a single strip about an inch wide and two of three inches long. Here are the pieces - they were easy to cut out using a normal Stanley knife:


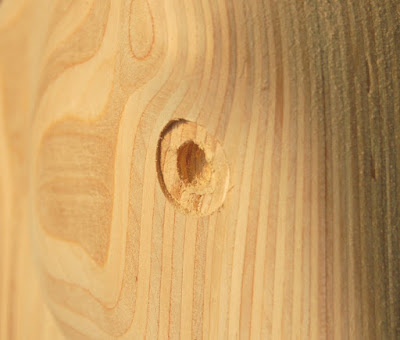
The pieces for the mane and forelock fit into a recess in the horse's neck, as seen here:
Decide which piece should go where for the best appearance, then attach them to the horse with normal PVA wood glue and a few tacks (supplied in the kit).
The tail was a little trickier, but not too tricky. The kit includes a tapered wooden bung that fits into the 22mm tail hole that I made previously; the idea is to roll a short piece of hide into a tube around the bung and then tap the whole thing into the tail hole with plenty of PVA glue. The tapered bung will creates a wedge effect and clamp the tail into the hole. This worked well enough to start with, but after a few months' of use, the tail came loose, so I re-glued with epoxy, and it's been solid ever since.
Here are the tail, mane and forelock after fitting:

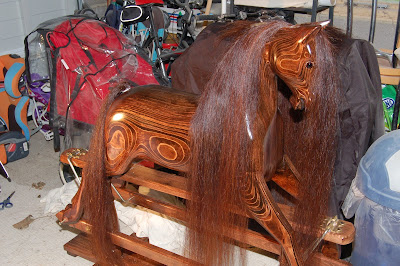
All the hair is much too long at this stage, but as soon as all the glue is dry you can give your horse a haircut in whatever style you choose!
Next comes the saddlery. If you know anything about how to saddle a horse, this should be easy enough, but I had to think about it for a while. I put the saddle on first but left the girth strap undone, then the neck/chest strap can go on - it has an additional strap that goes between the front legs and attaches to the girth strap of the saddle. The girth can then be buckled up as tight as possible. At this stage, it's important to put a couple of screws or nails through the girth strap securely into the horse's body - these will stop the saddle from slipping around and dumping your child on to the floor.

The halter, bit and reins then go over the head and can be buckled up on each side.

I was doing these last few steps in the last week before Christmas, just in time for my daughters to receive their extra-special present from Santa. I left the stand and the horse separate until Christmas Eve, because they're both quite large and much easier to lift and move when separate.
The final step, on Christmas Eve, was to bring the stand and horse into the house and attach them together. The horse is just lifted onto the stand so that its feet drop into the correct place on the rails, then a nut and bolt through each foot secure it in place. I didn't use any glue here, so that the horse can easily be removed again for transport if necessary.

So, here's the final result:

And that's the end of this blog! It's taken me a while to complete, but I wanted to document the whole process, for me and my daughters (when they're older) but also for anyone else who would enjoy this challenge. I hope you've enjoyed reading about the project, and if you do want to build a rocking horse of your own, please get in touch with Harry at the Ringinglow Rocking Horse Company.

The rocking horse kit comes complete with a section of a real horse's mane, still attached to the hide. There was more than enough to make the forelock, mane and tail for my horse, but it was pretty dirty and the hide was very dry, making it extremely stiff and hard to work with. The first job, then, is to soak the hide in water overnight to soften up the hide and loosen any dirt stuck to the hairs.
Once soaked, the hide becomes very pliable. I washed and rinsed the whole thing several times, using detergent to clean everything up. I did this in the bath in our house, which made things fairly easy, but you might prefer to do it outdoors if you're at all concerned about what might be in the 'dirt'!
Once clean, I allowed the hide and hair to dry for a few hours and then took it back out to the garage/workshop. It will take the hide several days to dry out again, so it will comfortably remain workable long enough to get everything fitted. You want it to be dry to the touch - no water dripping out! - but still pliable.
At this stage I hung the hair up from the ceiling and brushed it out:


Next I tried to figure out the best way to divide it up. The forelock and mane require three or four strips about an inch (two centimeters) wide, all with about the same amount and length of hair, and long enough when placed end to end to run from the base of the horse's neck to just in front of its ears. The tail requires a single strip about an inch wide and two of three inches long. Here are the pieces - they were easy to cut out using a normal Stanley knife:


The pieces for the mane and forelock fit into a recess in the horse's neck, as seen here:
 |
| A shallow (2-3mm) recess cut into the horse's neck. |
Decide which piece should go where for the best appearance, then attach them to the horse with normal PVA wood glue and a few tacks (supplied in the kit).
The tail was a little trickier, but not too tricky. The kit includes a tapered wooden bung that fits into the 22mm tail hole that I made previously; the idea is to roll a short piece of hide into a tube around the bung and then tap the whole thing into the tail hole with plenty of PVA glue. The tapered bung will creates a wedge effect and clamp the tail into the hole. This worked well enough to start with, but after a few months' of use, the tail came loose, so I re-glued with epoxy, and it's been solid ever since.
Here are the tail, mane and forelock after fitting:


All the hair is much too long at this stage, but as soon as all the glue is dry you can give your horse a haircut in whatever style you choose!
Next comes the saddlery. If you know anything about how to saddle a horse, this should be easy enough, but I had to think about it for a while. I put the saddle on first but left the girth strap undone, then the neck/chest strap can go on - it has an additional strap that goes between the front legs and attaches to the girth strap of the saddle. The girth can then be buckled up as tight as possible. At this stage, it's important to put a couple of screws or nails through the girth strap securely into the horse's body - these will stop the saddle from slipping around and dumping your child on to the floor.

The halter, bit and reins then go over the head and can be buckled up on each side.

I was doing these last few steps in the last week before Christmas, just in time for my daughters to receive their extra-special present from Santa. I left the stand and the horse separate until Christmas Eve, because they're both quite large and much easier to lift and move when separate.
The final step, on Christmas Eve, was to bring the stand and horse into the house and attach them together. The horse is just lifted onto the stand so that its feet drop into the correct place on the rails, then a nut and bolt through each foot secure it in place. I didn't use any glue here, so that the horse can easily be removed again for transport if necessary.

So, here's the final result:

And that's the end of this blog! It's taken me a while to complete, but I wanted to document the whole process, for me and my daughters (when they're older) but also for anyone else who would enjoy this challenge. I hope you've enjoyed reading about the project, and if you do want to build a rocking horse of your own, please get in touch with Harry at the Ringinglow Rocking Horse Company.

Um, gorgeous rocking horse but do you think the hair on a hide means it came from a dead horse? I hope not!
ReplyDeleteThanks Kara! It really is real horse hair from a dead horse; that's the traditional way. I guess there are probably artificial substitutes for vegetarian/vegan rocking horse builders to use, if they want to!
Delete