What's in the Box
The Rivelin rocking horse kit was delivered in three parts: one large cardboard box, strapped to a pallet, contained all the wooden parts, the hardware, the leather parts (saddle and tack) and the grooming kit. Around the same time, a shoe-box-sized delivery arrived containing the horse hair, some wood dye, some varnish and some sandpaper (Harry had included the sandpaper, very coarse 40-grit, to get me started on the substantial amount of sanding required... but more on that later). Finally, a Jiffy bag containing our custom-engraved brass plaque arrived about a week later - this is sent directly from the engraver, though it was ordered via Harry/Ringinglow - we never dealt with the engraver directly.
Here's how the large box was packed:

And here are the components for the stand laid out:

There are actually two small foot blocks as well - I forgot to pose them in this photo. The next post in this series will show the assembly of the stand; it goes together very easily. The only thing to be careful of is to get the wedged tenons in the correct orientation.
Here are the components of the rocking horse itself:

Two body halves, four legs, and four 'muscle blocks'. A muscle block is glued at the top of each leg to cover the dowels and screws holding the leg to the body.
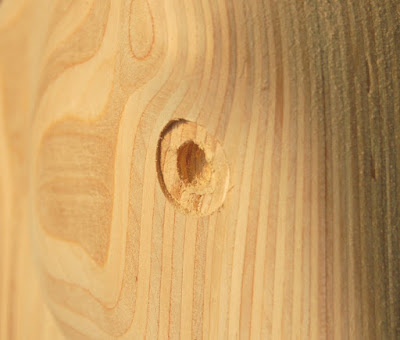
Assembly of the horse takes a bit more 'finessing' before gluing and a LOT of sanding once you have it assembled. I'll go into a lot more detail on the whole process in future posts. For now, let's see why so much sanding is needed. Take a look at this close-up:

You can see that the horse's body and legs are made from sheets of plywood glued together and then milled down by a computer-controlled milling machine. The milling process leaves the parts with hundreds of tiny steps, with each step following a contour line around the body. The legs are milled in the same way.
Although this milling process leaves a very accurately-shaped part, all those steps need to be sanded away to leave a nice smooth surface before you can get on with dying, staining or painting the horse.
For the assembly, you'll need:
These are all pretty standard except for the last. A flush trim saw is a small hand saw whose teeth have no 'set'; it's used for jobs like cutting off the ends of dowels, where you want to run the blade of the saw right up against another piece of your project. There are other ways of doing this, but the flush trim saw makes it very easy.
On a normal saw, the teeth are 'set' - bent outwards so that the kerf (the saw cut) is slightly wider than the blade, which helps with getting the sawdust out of the cut and stops the blade jamming. If you tried to flush-cut a dowel with a normal saw, the teeth would scratch the adjoining piece of wood. A flush trim saw, having no set, doesn't scratch the adjoining piece.
The good news is that a flush trim saw isn't expensive - I got one from Amazon for about £6 all-in. See this Google search for more information.
For the sanding and finishing of the horse body, a variety of tools will be useful. First and foremost, an electric sander, preferably a random orbit one, will make life much easier. You can use this with 80, 120 and 240 grit sanding discs (I think I got through four or five discs of each grade in all) to do almost all the sanding on the stand and the body of the horse.
However, the areas where the legs join the body need a bit of shaping and sculpting before you get into final sanding (don't be alarmed at this, I didn't find it difficult despite having no artistic capabilities whatsoever). For this, I used a 60-grit flap wheel like this:

These are available quite cheaply, a pound or two. Fitted to a mains-powered electric drill, I found this gave a good balance between removing material quickly whilst allowing finer control than the random orbit sander.
I also used files, planes and spokeshaves with varying amounts of success for this shaping/sculpting, but in hindsight I don't think they added much to the two sanders.

This will cost you about £25 but your lungs will thank you for the investment. I found it very comfortable to wear and a much better fit than the disposable paper masks, which always seem to leak around the sides of my nose.
If you have deeper pockets than me, a proper workshop dust extractor would be very handy, but I managed without.
Here's how the large box was packed:

And here are the components for the stand laid out:

There are actually two small foot blocks as well - I forgot to pose them in this photo. The next post in this series will show the assembly of the stand; it goes together very easily. The only thing to be careful of is to get the wedged tenons in the correct orientation.
Here are the components of the rocking horse itself:

Two body halves, four legs, and four 'muscle blocks'. A muscle block is glued at the top of each leg to cover the dowels and screws holding the leg to the body.
Assembly of the horse takes a bit more 'finessing' before gluing and a LOT of sanding once you have it assembled. I'll go into a lot more detail on the whole process in future posts. For now, let's see why so much sanding is needed. Take a look at this close-up:

You can see that the horse's body and legs are made from sheets of plywood glued together and then milled down by a computer-controlled milling machine. The milling process leaves the parts with hundreds of tiny steps, with each step following a contour line around the body. The legs are milled in the same way.
Although this milling process leaves a very accurately-shaped part, all those steps need to be sanded away to leave a nice smooth surface before you can get on with dying, staining or painting the horse.
Tools
Very few tools are required to fully assemble and finish this rocking horse. Access to some power tools will make things easier, of course, but they're not essential.For the assembly, you'll need:
- a sanding block with coarse sandpaper (80 grit)
- a power drill
- a 5mm wood bit and a countersink
- screwdrivers, or a power screw driver
- standard PVA wood glue
- a soft-faced mallet (or you could use a hammer so long as you protect the surface you're hitting with some scrap wood)
- some clamps
- a file or rasp
- some chisels (12mm or 18mm wide)
- a flush trim saw
These are all pretty standard except for the last. A flush trim saw is a small hand saw whose teeth have no 'set'; it's used for jobs like cutting off the ends of dowels, where you want to run the blade of the saw right up against another piece of your project. There are other ways of doing this, but the flush trim saw makes it very easy.
On a normal saw, the teeth are 'set' - bent outwards so that the kerf (the saw cut) is slightly wider than the blade, which helps with getting the sawdust out of the cut and stops the blade jamming. If you tried to flush-cut a dowel with a normal saw, the teeth would scratch the adjoining piece of wood. A flush trim saw, having no set, doesn't scratch the adjoining piece.
The good news is that a flush trim saw isn't expensive - I got one from Amazon for about £6 all-in. See this Google search for more information.
For the sanding and finishing of the horse body, a variety of tools will be useful. First and foremost, an electric sander, preferably a random orbit one, will make life much easier. You can use this with 80, 120 and 240 grit sanding discs (I think I got through four or five discs of each grade in all) to do almost all the sanding on the stand and the body of the horse.
However, the areas where the legs join the body need a bit of shaping and sculpting before you get into final sanding (don't be alarmed at this, I didn't find it difficult despite having no artistic capabilities whatsoever). For this, I used a 60-grit flap wheel like this:

I also used files, planes and spokeshaves with varying amounts of success for this shaping/sculpting, but in hindsight I don't think they added much to the two sanders.
Safety
Besides general common sense when working with cutting tools etc, the main safety issue with this project is all the dust from the sanding process. Remember, you're not just sanding wood, you're also sanding the glue/resin used in producing the plywood. You MUST wear eye protection AND a dust mask of some kind. You can get cheap paper dust filters from any DIY shop, but I invested in a proper respirator like this:
This will cost you about £25 but your lungs will thank you for the investment. I found it very comfortable to wear and a much better fit than the disposable paper masks, which always seem to leak around the sides of my nose.
If you have deeper pockets than me, a proper workshop dust extractor would be very handy, but I managed without.


Comments
Post a Comment